Showing posts with label 1982 trans am. Show all posts

Thursday, July 16, 2015

Parking and Headlights Lower Console Auxiliary Switch Wiring

I have been collaborating with Lambros Vassiliou on Face Book on a wiring diagram for hooking up an auxiliary switch to activate the Parking and Headlights using one of the lower console's SPDT lighted white rocker switches. According to Lambros this diagram should work for wiring up the Headlights switch using this method on the 1982 Trans Am. I'm not sure about later models, I think it may depend on how the switch is wired so you will need to do some checking on that. Now I have not tested this wiring scheme yet. The Diodes that will be used are the 1N4007 Rectifier type (top right), 
the Relays can be SPST or SPDT rated at 20 to 30 Amps, I have a couple of SPST 40 Amp relays so I'll be using those (right).

I think I have everything I need to give this a shot, I need to pick up some more solder and I'm not sure if I want to mount my Diodes onto a small piece of PCB board or just do them as "in-line" Diodes. But it looks like I should be pretty close to doing a video to show how this works. From what I can see of the wiring diagram it looks like it would be easy to even use one of the Upper Console DPDT lighted rockers for the Parking and Headlights too. ;)


Just to clarify, this is what the plug on my Parking/Headlights combo switch looks like. As you can see it has an Orange, Yellow, Brown, White and what looks to be a fat 14 AWG Red wire on it. Now in the diagram above there is nothing happening with the White wire so I'm still trying to get a straight answer on what if anything happens with that wire??

NOTE: 

OK after some Multimeter testing on the stock OEM switch I had kicking around from the parts car it would appear that in the "OFF" position that there is a continuity between the White and Orange wire. Based on those findings I am going to try this diagram suggested by Mark Rolfe out as it seems to make the most sense with the white wire included into the scenario.
Since the white wire obviously has an internal connection on the stock switch in "OFF" position, the first SPDT Relay makes sense as in off position the white wire would be connected to the Red wire (You could use either Orange or Red as both are 12V). I'll be able to test this out when I have a SPDT Relay, right now I just have 2 SPST Relays and I need the one with the extra 87A pin for the White wire.

Sunday, July 12, 2015

Headlights Switch Relocation

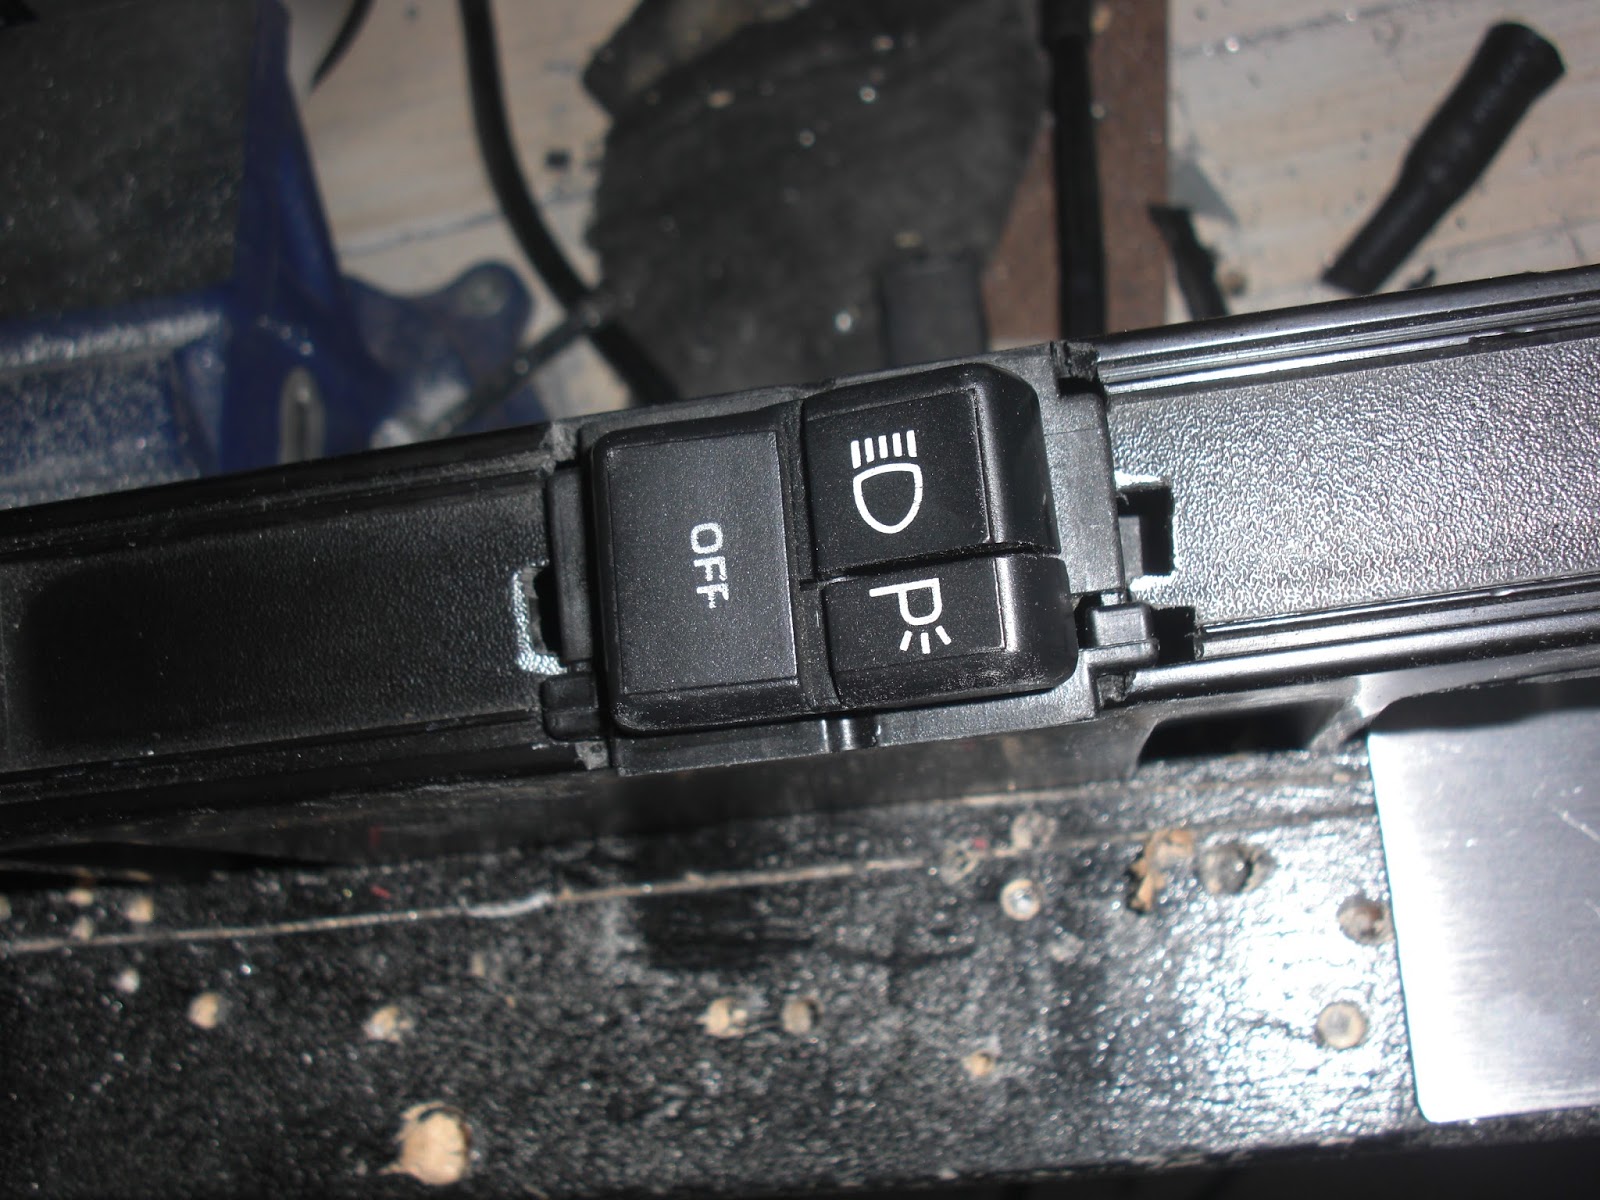
 I relocated my Headlights and Parking Lights switch onto that piece of Dash Trim that fit along the lower part of the stock OEM dash just below where the Gauge Cluster used to be. I had to do some cotton and modifying of the plastic part to make it fit into the space with my wire looms but got it to eventually fit in there nicely again. The next step was to make an aluminum bezel to fit over the Headlights switch. I cut out a piece of aluminum and cut out a hole the same size and shape of the hole that was in the stock OEM bezel that held both the Headlights and Dash illumination dimmer switches. I sanded it down (top left) and then marked where I would need to bend it (top right). If you have a "Metal Break" bending the aluminum is easy if not you can do what I did and use a Vice and a hammer.

I then cut out a hole in the plastic dash trim (left) big enough for the Headlights Switch and then fit the switch into place (right). I put the plug back on the end and test fit the whole thing back into the dash. I had to use my Dremel to do a little cutting in the stock OEM dash to make the plug fit into the space better because it's a big fat beast of a plug but with a little cutting work it can be made to fit nicely to the hole. I fed the wires from the plug in through the hole and down in through the underside of the dash, that way I can solder them the the other wires I have going into the wires that came out of the area of the stock OEM dash that the original plug was attached too. Basically all I am doing is extending the wires and relocating the switch to somewhere more convenient.

After bending the aluminum bezel into the right shape I fit it into place over the Headlights switch (left) and drilled in four holes to screw it onto the dash trim with. Next I sanded down the aluminum bezel one last time before giving it a good cleaning before painting it (right).

Once the paint was dry after baking in the hot sun for a few hours (left) I then attached the bezel to the plastic trim with four small black screws (right). With that job finally done the last thing to do was to attach the whole assembly onto the stock OEM dash and give the Headlights a test, something I was pretty sure I had never done since the car arrived almost two years ago. WOW! two years ago!! It's sometimes so surreal thinking about that, the time has gone by so fast and so much has been done on my K.I.T.T. Project.

Here is the final assembly in place, it's not screwed in yet as I have a lot more mucking about to do with wiring and such but it's in place and has been tested out, check out the two videos in my previous postings to see how that turned out. ;)


Friday, June 26, 2015

Cowl Induction Hood Modification Part 3


My version of the Cowl Induction Hood modification is coming along slowly as I figure out how to do this. I have been in contact with Antoni J. Hairston
on Face Book who I am closely following for my version of the modification. On his version he says that the green light is hooked up to the Fuel Pump Relay, however on my 1982 Trans Am which has a Chevy Small Block V8 and some other after market modifications, I think my Fuel Pump may be a mechanical one. More investigation there is needed to be sure. But if it is a mechanical one he say for my green light I may need to tap into the hot ignition wire for my green light.

For now though I wanted to see how well my bracket for the lights was going to fit so I installed it temporarily for a test fitting to make sure the lights will be visible and that the unit fits into place well. So far so good. You can see in these shots (Above) how the unit fits inside of the Turbo Hood bulge and in the shots (below) how the lights are visible inside of the air flow opening.


Now keep in mind that this is NOT something K.I.T.T. actually had in the show, this is just what I think is a very 
cool modification that is WORTHY of K.I.T.T.


Wednesday, June 24, 2015

Cowl Induction Hood Modification

I cleaned up the solenoid and actuator arm that controls the air flow flap as it had a little bit of surface rust on it. I cleaned off all of the rust with a gel rust remover, cleaned it up and then painted it black. Left the parts to dry overnight before re-assembling it back together.


Next step was to make some sort of bracket or mount that will hold the lights and allow air to flow freely into the opening. I made this bracket out of some stock aluminum that you can get from the metal centre of most hardware stores. I cut it to fit inside of the air induction unit and cut tabs to mount my light on.

The basic idea here is to do something very similar to what this other Knight Rider car builder has done with his air induction unit. I have added an extra tab that I figure will be a great place to put my "Check Engine" light at the far right of the mounting bracket.


Wednesday, May 27, 2015

Modifications to the Front Ground Effects

I figured now was as good as any time to do something with my Front Ground Effects, they had been kind of just hanging loose for the better part of over a year after I had installed my Knight Rider Front Nose. At first I was not really sure what to do with them and I was not finding a lot of information out there as to what other people within the Knight Rider Community were doing with theirs. Although about a week ago I did see one fellow on Face Book post what he had done which involved doing some modifications to the Front Nose fibreglass itself. I was not sure I wanted to go quite that far as from what I could see from looking at the underside of my car that it looked like just making a few modifications the the Ground Effects themselves with my Dremel tool would be the simpler solution. So after much "humming & hawing" about what to do I decided to go with this idea.

First thing to do was jack up the car so I can get my tools under there to work. Now on the inside of the Ground Effects there is a ridge of plastic that needed to be trimmed off so that the Ground Effects panel would fit more flush with the bottom part of the Knight Rider Front Nose. I used my Dremel tool to trim off the ridge of plastic area I have circled in the the image on the right.


Now on the outer most edge of the Ground Effects panels you'll see another ridge of plastic that also needs to be trimmed off. If you press the Ground Effects up close to the bottom of the Knight Rider Front Nose you'll see exactly where to trim in order to make them fit flush with the bottom of the Front Nose. You can see I have also used Trim Fasteners to secure them to the Front Nose. I needed to use my Step Drill bit to widen out the holes in the Ground Effects for the Trim Fasteners and then use a drill bit to drill holes into the bottom of the Front Nose big enough for them to fit snugly into. Like I say I'm not sure if this is how a lot of people do it but this is just what I did in order to get my Front Ground Effects to fit onto my Knight Rider Front Nose.

Wednesday, December 17, 2014

More Work On The Digital Power Distribution Block And In-line Breaker Switch Mounting Bed


I did some more work on the mounting bed for my digital power distribution block and in-line 100 amp breaker switch mounting bed. I stopped in at Canadian Tire with my sweetie she new ducked out to go for a quick nibble at Perkins for some fries and gravy.... Mmmmm Fries and gravy :P While at Canadian Tire I picked up a length of 1 gauge battery cable for connecting to my digital power distribution block on the Lexan plastic mounting bed I made to fit into the engine bay. That red wire you see (top right) coming from the power distribution block and going into the 100 amp breaker switch will continue on to that 105 amp Bussmann 12 position blade fuse block I have mounted under the passenger side of the car. I'll keep it a conservative 100 amps max to be extra cautious that way there is very little chance of any overloading of the circuit or fuse block. Almost done my set up on this little project, I need to add a ring terminal to the little black ground wire coming from the back of the digital power distribution block so I can found that to the car. I then need to run some 4 gauge to the 100 amp fuse block although the 10 gauge is most likely more that good enough but I'll beef it up to the 4 gauge just in case I decide to run my fog lights through the 100 amp fuse block.... I have to admit it would cut down significantly on the wires currently running from the battery down the inside of the fender, through the old antenna wire hole and up under the dash.... just might make good smart sense to do it this way, less wires to worry about coming loose or rubbing up against sharp metal edges although I have been careful to foresee anything like that and take measures against such things happening.


Saturday, August 16, 2014

Headlight Covers Repainting

I started painting the headlight covers since they had some light chipping along the front edges where the original white paint was starting to show through. I was going to take them right off and do both sides but then determined it would be just as easy to just mask them off from the rest of the car and prime and paint them in place.

First I needed to prep the surface of the covers by going over each one with scuff pad. I know a lot of people use the grey scuff pad for this but I find with the sand-able primer I can get away with using the red scuff pad, its a little more or a coarser grade but the primer fills in the surface really well.


Once all sanded or I should say scuffed up it was time to mask off the covers from the rest of the car. Normally I use plastic drop sheet material for my masking but for small stuff like this and considering that it was an under the hood kind of area news print is more than good enough. I'm actually using flyers which are a little thicker paper.

Once all masked off it was time to give each headlight cover a good cleaning with some isopropyl alcohol to clean up and grease and dust. Then a going over with a tac cloth.


Once the primer was dry it was time to paint. I let the paint fully dry over night before putting on a few coats of clear coat. I'll let that dry over night as well so that way the clear coat is good and set before the wet sanding.

They look pretty shiny already with the clear coat applied. They will look even shiner when they are eventually wet sanded and then polished.


With the hood open I took the time to paint the edged of the scanner bar a matt black so it does not stick out as much. I just used my fine brush and brushed on some model paint as it's just a small area and that paint is pretty durable. I may eventually make some kind of plastic covers for those end pieces just to make the ends look a little neater, I'll see what I come up with and what looks good.


Monday, August 11, 2014

Front End Nearing Completion

K.I.T.T.s front end is nearing completion. I still have a few things to do but as you can see it is getting closer and closer to being done. You know I was amazed going through my photographs the other day at just how far I have come along with this project. I mean for a guy with absolutely no prior automotive experience I feel I have done pretty darned good all things being considered. I am well on my way to achieving a life long dream of owning my very own Knight Rider car.


I took some of the rubber that was on the original GM flat hood that came stock with my '82 Trans Am and cut some to fit across the top of the scanner between the hood so it helps close up the small gap at the top of the scanner. The rubber also acts as a bit of cushion between the top of the scanner and the front of the hood.


Here is a shot of K.I.T.T. with his new Turbo Hood finally on and his scanner working.

You can see I still need to do something with those front ground effects, not yet sure if I am going to use trim fasteners to attach those to the underside of the front nose or if people just take them out. I'm still looking into that.


I think I figured out the issues I was having with how the air cleaner assembly was attached. My guess is that they must have done some kind of engine modification that bypasses most of what the air cleaners original function was as that small short hose was clearly NOT attached to the Carburetor, where it would have gone was sealed up with a short piece of rubber hose with a screw in the end. So I figured OK if it was working fine like that before why mess with something I don't understand I'll just attach the new shiny one in the same manor. I'll get someone with much more automotive skills than me to have a look at it later on when I can get a chance.

Wednesday, July 2, 2014

Turbo Hood Waiting

I took the precaution of wrapping up my edged and top with bubble wrap, foam padding and cardboard because the route to the garage is a little precarious and anything can happen between my back room and there. ;)

All I need now is someone to help carry it out and gel me hold it steady while I bolt it onto the car. With a little help it's a 10 minute job at best. I've been waiting out our crappy weather for a nice day to do this little job too.

On another note, my Marine speakers should be arriving today so I'll be able to hook those up to Brenon's LED scanner box after I place them into my custom enclosure that I'm making using some PVC plumbing pipe. That should be fun. Once that's done I should be able to re-hook up my batter and test out the electronics that I have installed into K.I.T.T. so far.... keeping my fingers crossed that I don't turn out to have any dodgy wiring on my hands... :/ I have tried to be a careful as possible and have checking things numerous times to make sure I have done a good job.... but even still, being new to this I can't help but be a little apprehensive about it :/

Friday, June 6, 2014

June General Updates

Some general updates for stuff I have been working on over the last several weeks just in case you were beginning to think that I have been slacking.  I patched up the antenna hole in the fender with some metal screen patch and some Bondo. I accidentally stuck my finger in it before it had a chance to fully cure so I had to skim it over with a little extra Bondo once the first application had fully cured. Primed and painted it. It just need some wet sanding when the paint has had a chance to cure. Maybe another light coat of paint after the wet sanding, I'll see where I'm at when that is done. Once wet sanded and eventually clear coated you will never know that there ever was an antenna hole in the fender.

I have decided that the whole car does not need to be painted just re-touched up here and there. I have found that the Duplicolor Universal Black seems to be a perfect match for the nice deep rich black currently on the car so I might as well just touch up where needed as it's mostly a few minor rust spots along weather stripping and a few paint chips here and there. I did have to re-do most of the rear spoiler, mostly just a few paint chips along the edges but I did discover that the underside of the spoiler was given the same kind of paint job treatment as the rear taillights compartment, just not cleaned up very well so the paint did not adhere very well to the original paint surface.

I have finally started to get the first few coats of paint on the front nose. I'm doing it with Duplicolor Universal Black in the spray cans and just wet sanding out any paint runs with 1000 grit wet dry sandpaper. .. So far it's turning out very well considering the use of spray cans... I wish Duplicolor made the Universal Black in a spray gun for but for some twisted reason they don't. .. Oh well.... I can use spray cans pretty good and I do have the clear coat for my spray guns so that is what really maters.... heck half the time you still end up doing a little wet sanding and polishing out rough spots anyways. 

I gave the nose a second coat of paint after wet sanding some of the paint runs and rough spots off tomorrow if all goes well after some more wet sanding I may be able to clear coat it and then let it sit for a full day before doing any wet sanding and polishing of the clear coat layer... if that goes well then I should be able to put the front nose on the car.

I got word From Brenon Fullbright that my scanner is done and has been shipped so the timing could not have been any more perfect. Can't wait to see Brenon's awesome work. I have seen other scanners he has done for other Knight Rider builders and they look just absolutely AMAZING!! I'm so stoked.

Thursday, April 24, 2014

Bumper Repainted

I have finally gotten around to repainting the rear bumper for K.I.T.T. I still need to do a little touch up and then clear coat it. Slowly but surely getting work progressing on the back of the car. I'm still waiting for the weather to get a little more warmer before I can paint that compartment behind where the tail lights assembly sits. Once we get some nice weather I'll finally be able to prime, paint and clear coat the tail light compartment and finally get Billy Gunther's Tail Light Blackouts kit from Knight Designs fully installed. Right now all I have been able to do is put together the assembly and do a test fit... I SO can't wait for the painting and prep work to be done so I can get that puppy installed... gonna look so cool :)

Monday, April 21, 2014

Gage cluster connectors

Gage cluster connectors detail
I have taken the liberty of identifying am labelling each of the wires on the connectors that connect to the circuit pathways on the back of the gage cluster. I figured I would do this for educational purposes and to help anyone wishing to not use the gage cluster when installing either their Knight Rider dash or any other kind of after market digital dash setups.

Sunday, April 20, 2014

T - tap connectors

T - tap connectors

Now this is just for illustration purposes. I took one of these connectors that makes the connections to the back of the gage cluster out of my parts car so you can see that this is what I was talking about in my last post as one possibility of tapping directly into the wires. My other thought is to just solder wires directly to where you need to make your connections on the copper prongs and slip over some heat shrink tubing and label each wire accordingly. Not yet sure which route I am going to take but this is certainly some ideas to play with.