Showing posts with label kit's voice box. Show all posts

Tuesday, July 7, 2015

DTMF Tone Request Experimentations


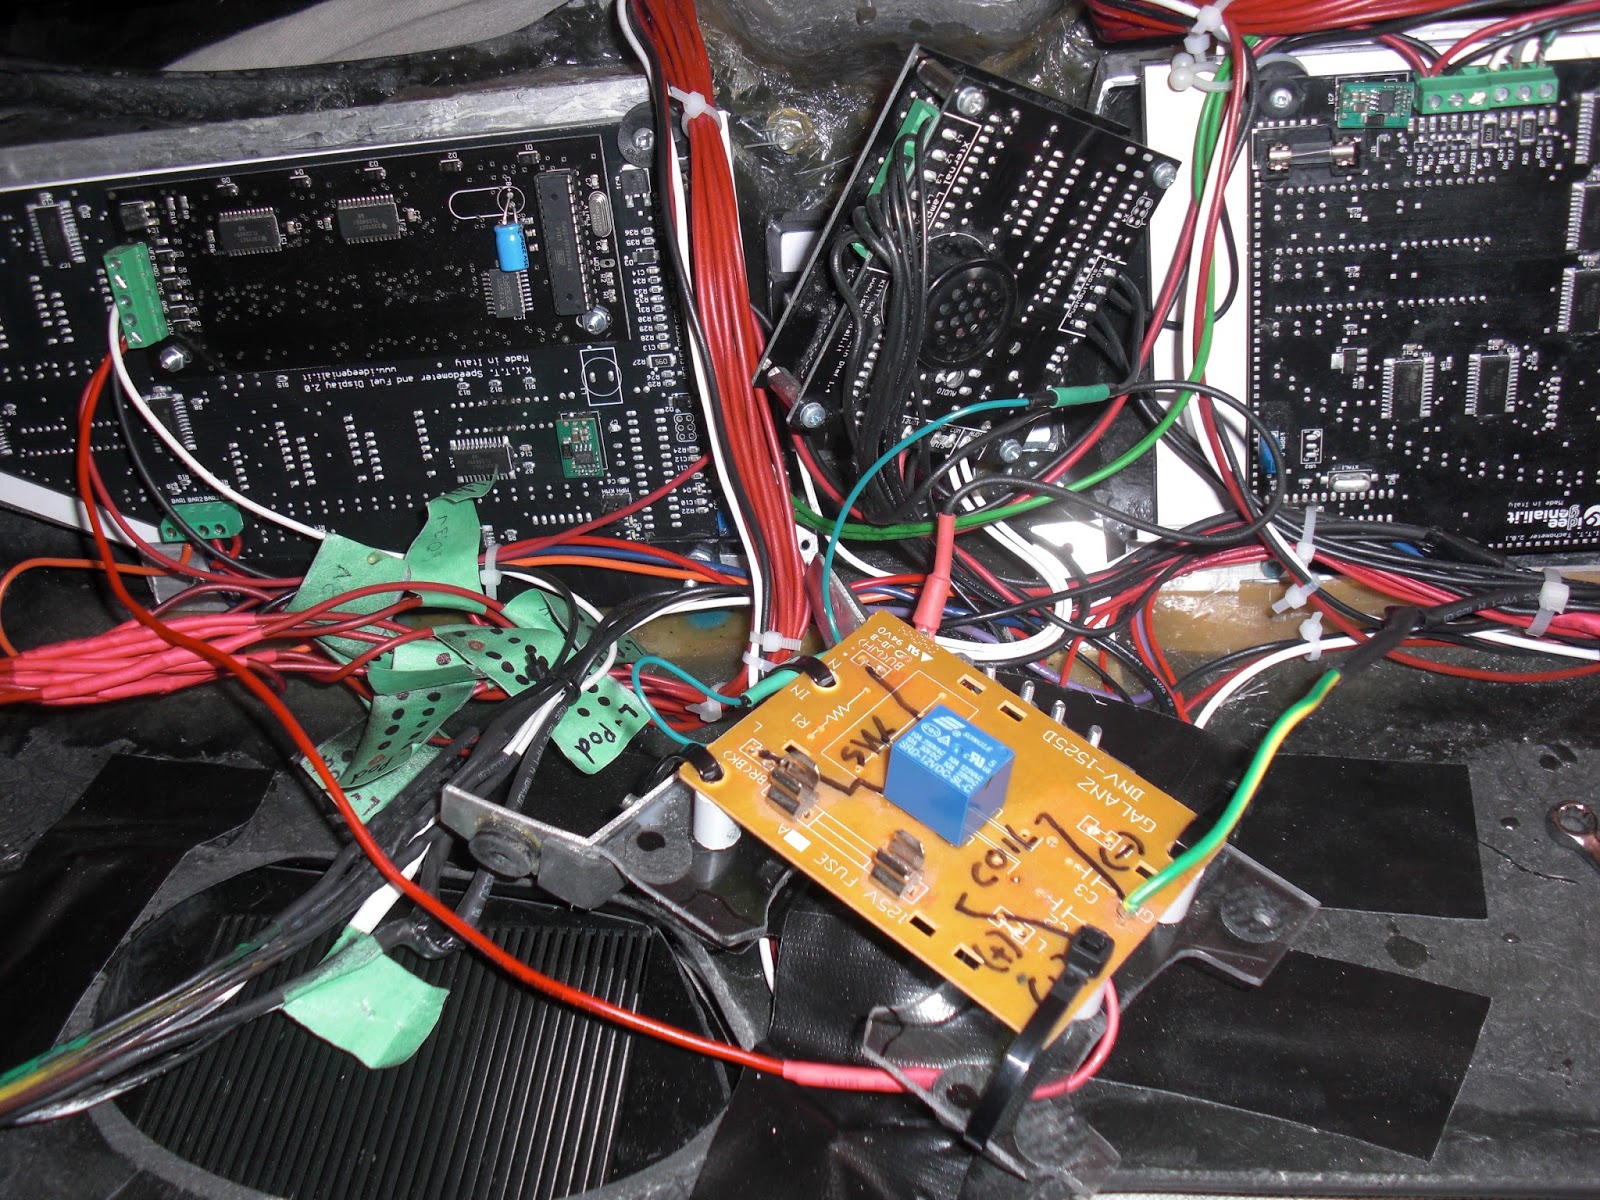
In making sure that I well isolate the Voice Box's DTMF tone request from any momentary buttons I have I figured I would rig up a mini Songo 12V Relay very close to the Voce Box. Now what happens here is that when a DTMF Tone request is called by any momentary button I have hooked up to a wire that I am calling "DTMF Tone Request" THAT wire goes to the magnetic coil of this mini Songo 12V Relay's Ground (-), the other side of the magnetic coil goes to 12V (+). So this then trips the Relay's internal isolated switch which I then have connected to both the Voice Box's Ground (-) and also the DTMF Tone Request port. You will have to excuse my somewhat over sized piece of PCB board it was all I had kicking around that I could use to mount this small relay onto and connect wires too. I'll most likely change it later when I get some smaller pieces of PCB Proto-Board. The wires from the Switch Pods that request the DTMF tone I just have going directly into the Voice Box's DTMF Tone request port.


Now the other part of today's fun was to wire up my Relays board for some experimentation just to make sure that I am understanding correctly just what is going on with this thing and how it interacts with my buttons. All of this stuff gets pretty complicated if you are new to electronics like me. ;) My latest video that I posted to my blog explains best and visually how I have it all hooked up. But basically the Ground pulse buttons from my Space Matt buttons go into the ports on the board that connect to the Diodes, they connect to the DTMF Tone Request wire and also to the individual relays on the board. Each relays gets it's own ground pulse from each of the Space Matt buttons activating the Relays internal switch which I can hook up to any device I want to activate, in my case 5 of the Space Matt buttons are simply activating buttons that control the setting for my LCD screen. Although I have not yet hooked it up, a 6th button will cycle the Message Centre while producing a DTMF tone with each press of the button. The rest of the Space Matt buttons I don't have plans for just yet.

My Voice Projection unit activation button is wired up the same way as the Dash Power Button and makes a connection to ground to activate the Step Relay, this one was a little more tricky. You can see in the image above (middle left) that branching off from the wire that comes from the Normally Open terminal of the V.P. power button that I have placed a Diode in-line connecting to the DTMF Tone Request block.... which I moved onto the back of my Relays Board. Without the Diode in place the Space Matt buttons would activate the Step Relay for the Voice Projection unit as well, not good, so the Diode sure takes care of that as it only allows current to travel in one direction... taking me a while to get the hang of that but it works and it's cool... gotta love electronics ;)

So now with all of this in place I'll have to test it out on the Voice Box once the replacement I.C. Chip 01 comes in the mail. If everything works out well, and so far I can't see what not as a Relay does what a Relay does ;) But as I say if all goes well I can look into experimenting with the Optocouplers when they arrive and see if I can make a set up like this that takes up a lot less space. This would be fine if I only wanted to use a small amount of my Space Matt buttons but I can see eventually wanting to use more down the road as I trick out K.I.T.T. with more cool gadgets ;)   


Monday, April 27, 2015

Alternate Space Matt Buttons Wiring Scheme

I was having some issues trying to work out a way to utilize each of my Space Matt buttons that I had made out of an old Texas Instruments Calculator. The problem was that the V.B. (Voice Box) random DTMF tone generator needs a ground pulse to activate a random tone, but with this type of button configuration where all of the buttons are connected to one wire (in this case ground) and the other buttons individual connections to that ground it was difficult coming up with a way to activate both a device and generate a tone through the V.B. So I came up with this idea. Seen here in my diagram I have two buttons wired to show a way in which they can all be wired in the same way to do just that, activate a device and generate a tone. In my diagram the ground connection through any one chosen Space Matt buttons will activate the relay's magnetic coil causing it's internal switch to close, in this case the needed ground connection from the V.B.'s DTMF tone generator to ground. It's a bit daunting having to use all of those relays but I can't think of another way off hand how to do this. Maybe those small "Songle" I think is the name of them relays would do the trick for this?

Example Image of "Songle" relay.

Monday, April 20, 2015

Testing Out My Calculator Space Matt Buttons

Although I have not gotten all of the wires from my make shift Space Matt Buttons wired into Molex Connectors yet, almost there just need to get some more 22 AWG wire as I ran out yesterday. I figured I would work out a diagram of how the buttons are configured and what I'm proposing to do with them in regards to using them to cycle through the message in the Message Centre and have then produce a random DTMF tone from the built in tone generator in the Knight Rider World Voice Box (V.B.)

Theoretically I'm thinking this should work based on the instructions that came with the Knight Rider dash electronics. As you can see in my diagram I have combined all of the momentary switch button wires into one wire to ground, they do have the option to be used individually in the future as I have wired them up to the Molex connectors separately. But for my immediate purpose right now just a single ground signal from all of the buttons to cycle through the Message Centre and request a random DTMF Tone from the V.B. will do for now. I know from my test yesterday that the Message Centre will cycle through with a simple Momentary switch. My only concern right now is are the V.B. DTMF Tone Generator and the Message Centre momentary switch options wired the same way?? This is something that needs to be figured out.

NOTE: Today I did a Multi Meter test on both the Message Centre Cycle Connections and the V.B. DTMF Tone Request Connections and get a reading of around 3.9 when set to DC Voltage so I think they are set up the same way as far as input signal. 

Thursday, May 22, 2014

Voice Box Bezel Arrives

Yayyyyy.  My K.I.T.T.  voice box bezel has arrived from Knight Rider World.  Awesome! So now I'll be able to get that and my VB module installed into the two TV  dash soon. I just need to get some other projects done and out of my back work room first. ;-)

I am very pleased with the quality of this VB bezel, it's solid very sturdy construction and the overlays are colourful and very well made. I can't wait to see how this will look along with my VB module that I also got from Knight Rider World.

Saturday, April 26, 2014

K.I.T.T.'s Voice Box Bezel Ordered

Probably one of K.I.T.T.'s most famous and prominent features next to his scanner is the voice box. I have finally gotten around to ordering the bezel for my 2 TV dash, both from Knight Rider World. I can't wait to get his voice modulator installed into my dash. lol right now I have it sitting upstairs in our bedroom loft under the stars just so I have a little more room in my back room to prime, paint and clear coat the rear bumper and then finally the Turbo Hood.... there is a pain in the backside project that I had wanted to get done all winter but not having a simple box fan for ventilation was holding things up.... Oh well... just as well as it probably would have been too cold for the paint to set properly with the window open anyways ;) Warmer weather coming so it's time to "Get it On!"