I picked up some coloured 12V DC Indicator lights from Tip Top Electronics today and installed them into my mounting bracket I had made from some stock aluminum. I'm not 100% sure on the colour arrangement but for now this will do. I have added and extra red indicator light that is going to serve as my "Check Engine" light seeing how the Knight Rider dash electronics does not have one and I feel it is important to have one somewhere, so this seems as good as any place because it will be noticeable especially at night.
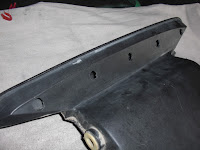
I drilled in some holes into the back of the plastic Air Induction Unit to accommodate the backs of the indicator lights as they went back far enough to interfere a little with the back of the air opening. I guess a smaller light would have been better which is something for you to consider if you are going to do the same thing. But even then your wires need to come out somewhere so it's not that big of a deal I don't think. I used a "Step Drill Bit" to do the job.
I then threaded the wires for each indicator light in through the air opening and into each of the holes drilled into the plastic. I then used a couple of small bolts and washers to secure the whole assembly into place. Now all I need to do is figure out how that other Knight Rider Car builder on YouTube wired up this crazy cool set up. My extra "Check Engine" light is easy enough as it's just a simple light wired up the same was as the one from the original Gauge Cluster.


No comments:
Post a Comment